I applied with a company locally with the name Semper Solaris on September 14th, 2020.
I had been unemployed for over a year and really needed to get back into the job market. The coronavirus pandemic had taken a heavy toll on me as a lot of job opportunities dried up for me. I tried my best to update my skills to be more relevant to the job market. Shortly after I completed a coding bootcamp for modern web development frameworks, I found Semper’s job posting on LinkedIn and applied.
Day 1
On the early morning of September 21st, 2010, I received the following email at 4:53AM local time from recruit.sempersolaris@gmail.com. (Note that this is 2:53PM Moscow time).
Dear Johnny
Thank you for your application for the Software Engineer (REMOTE)
position at Semper Solaris on LinkedIn. After reviewing your
application, our online recruitment team has recommended you for the
open position and you're among the candidates shortlisted for a
virtual screening test/interview session with a Senior Recruiter at
Semper Solaris.
This virtual screening test/interview is online through Email
correspondence and Telegram. The window for this screening
test/interview is Monday 09/21/2020. You are to immediately contact
the Senior Recruiter Mr. Alex Campos at his email
(recruit.sempersolariscareer@gmail.com) to acknowledge the receipt of
this email and to confirm your availability and to schedule your
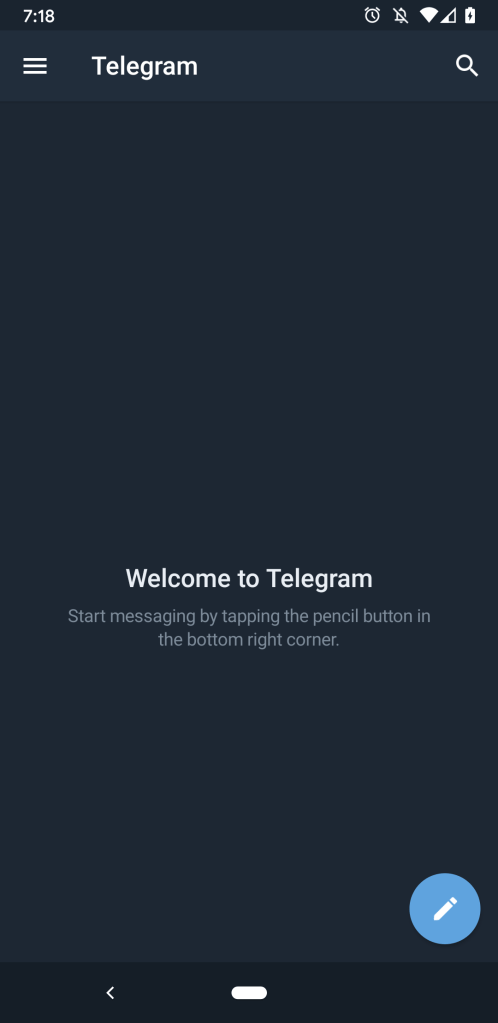
interview. You should also add him on Telegram with the link
https://t.me/Interviewconsultant.
The goal of this interview is for us to get to know you better, and
for you to ask any questions you may have. We want to make sure that
your skills, goals and ambitions match our company’s culture and the
position. NOTE: It is imperative that you send email to the Senior
Recruiter Mr. Alex Campos to proceed with the screening process. The
email again for the interview is recruit.sempersolariscareer@gmail.com
Accept the assurance of our best wishes and please do stay safe during
this COVID-19 pandemic.
Best Regards
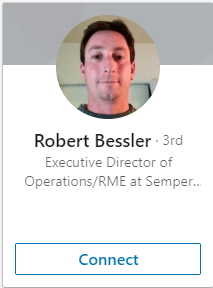
Robert Bessler
Executive Director
Semper Solaris.It is highly unusual for the email to have come from a different host than their actual website https://www.sempersolaris.com/. Additionally, why would they ask a candidate to download a secure messaging application produced in Russia to get through the interview process? Why is the only available time slot to speak with the “Senior Recruiter” the same day?
There are some additional red flags in this email that I didn’t notice at the time.
But it should be noted that the name in the signature is actually the executive director at Semper Solaris.
Remember this detail.
I contacted “Alex Campos, Senior Recruiter” at the provided email address and he responded at 9:13 AM with:
Hello Johnny

 Thank you again for your interest in employment at Semper Solaris. We are recruiting via online potential employees who would eventually have an office space at home.

 Semper Solaris, we are proud to be a top solar, battery storage, roofing, heating and air conditioning provider and to install our products for a growing customer base in California. We have received numerous awards, maintain an A rating with the Better Business Bureau, and rely on referrals from happy clients as a major part of our business. The results speak for themselves.

 We have  carefully considered your application during the initial screening and will now proceed to administer a Screening test/Interview for you. In order for us to move ahead with the selection process, please reply this email to confirm your details as follows:

Name :
Phone Number :
Location:

I will email you the Screening Test/Interview Questions as soon I receive your email with the above details.

Thank you
All of the details in this email are correct and there are no red flags.
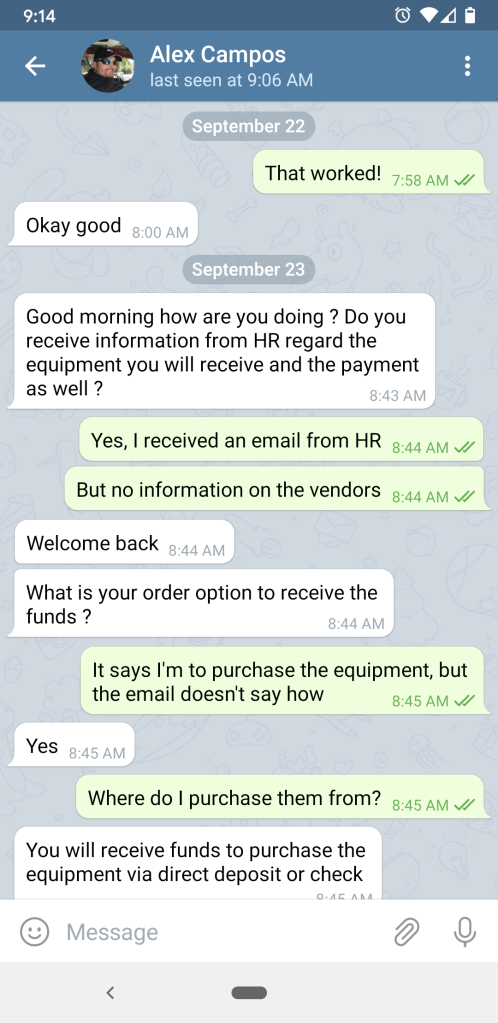
Next up, at 9:31 AM, he provided a pdf with questions for me to answer within 90 minutes.
Note that there is no coding assessment. A lot of the questions provided are general and vague. But again, I didn’t think anything of it. I responded to the questions. He responded with the following email at 10:23 AM:
Hello Johnny

 Thank you for completing the Screening test/Interview Questions. I acknowledge the receipt of your  answers. Our team will review your answers and forward the same to the Hiring Board for their decision and I will get back to you with feedback from the Board's decision in about 30 minute..

 This is going to be strictly an online remote (work from home) job and the working hours are flexible which means you can choose to work from anytime of your choice. Furthermore you will be undergoing  training before you start working fully if you are hired at the end of this process. The  pay is $60 per hour and training is $30 per hour and will be getting payment weekly via check or direct deposit, depending on which you prefer.

Stand by while I forward your interview answers to the hiring board.
Note the unusual grammar in this email.
At 11:10AM, he sent me the following email:
Dear Johnny

 It was a pleasure to interview you for the position of Software Engineer (REMOTE) in our Company. I am pleased to inform you that due to your level of experience and your working skills, the company has decided to hire you as one of our Software Engineers(REMOTE).

 On the behalf of our firm, I congratulate you on your achievement. You are now offered an opportunity to be part of Semper Solaris Team. We believe that your knowledge, skills and experience would be an ideal fit for our creative team and make a significant contribution to the overall success of the Company.

 You will receive your duties everyday via email and I will be online to walk you through your tasks.You will be undergoing a 3 to 5 days online training, via Skype and Cisco Webex, immediately after setting up your mini office. We are starting you with $60 per hour and you will receive your pay weekly via wire transfer, direct deposit or check, depending on which you prefer. Benefits  include: Health and Dental Insurance, Employee Wellness and Paid Time Off. You will be enrolled for other benefits after a period of 3 months of working with us.

 We are going to be communicating virtually till after 5 days of working with us, subsequently a user and password will be given to you including an up link to the company server and a list of contact phone numbers to various departments will be sent to you including all necessary forms to fill out. Before you start work, you will receive a payment(check) which will be used to set up your mini office by purchasing the office equipment and software needed to start your training and work.

 You will be receiving your Employment Offer Letter from HR via email to sign tomorrow. Our aim is for you to start training as soon as possible. You are to forward the following information to enable the secretary to register you.

Your Full Name:
Full Home Address:
Phone number:
Your Email :

We assure you that you  will thrive and flourish in our company. If you accept our proposal, it would be a great addition to your experience.

Congratulations! .

Kind Regards,
This is all within the same day and only within a time window about about 2 hours.
At this point, I have not spoken to anyone at the company live. No phone call, no webex or Zoom call, nothing. All correspondence up to this point had been over email.
Further the email says, “You will receive your duties everyday via email.” This is very bizarre. Most tasks at software companies are listed out on some sort of issue tracking software. But again, I was too hopeful and decided to continue the conversation.
Day 2
The next day, I received the employment letter.
And the following email, this time from info@sempersolariscareer.com at 4:35AM:
Hello Johnny,

  Congratulations on joining Semper Solaris. Attached to this email is the Company Employment Offer Letter you need to sign. You are directed to print-out this letter, read carefully and append your signature. Please note that the following equipment will be delivered to your doorstep to set up your home office next week. *iMac Pro eight-core, 3.2GHz processor includes 27-inch 5Kdisplay Hp LaserJet Pro M15w Printer. External hard drive/backup system. Headset with microphone. Networking and router capabilities. Surge Protectors and Automated Time Tracker. ProofHub. GitHub. Adobe Dreamweaver CC. Crimson Editor.

  You are to attach to this document a copy of your valid ID for employment confirmation. After this, the check to pay for the equipment listed above for your mini office equipment will be mailed out today so we can proceed to next step which is the training.

  Note: Upon signing of this contract with the company you are bound by LAW to not destroy any of the company's property i.e: Equipment sent and delivered to you for your work or Check sent to you for payment. Contravening any of these rules will render this contract null and void and penalties will be incurred.

Regards,
Human Resources Department,
Semper Solaris.
1805 John Towers Ave
El Cajon, CA 92020, USA.
The email is signed, “Human Resources Department” rather than any individuals name. This is when I also started to notice the weird period (.) at the end of the company name. Other than that and the weird time the email was sent, I didn’t have any suspicions.
After signing and returning the document along with a copy of my driver’s license, “Alex” began to contact me again, to schedule a chat via Telegram.

At this point, I thought, “well, at least he has a face.”
Day 3
The next day, I received an email from HR supposedly with details on the equipment purchase at 4:35AM from the same info@sempersolariscareer.com:
Dear Johnny,
Congratulations, and welcome to our team. You were our final choice of all the number of applicants for this position. We chose you because you possess the specific skills/abilities/attributes that the candidate should possesses. We’re looking forward to start up your online training/ orientation program as soon as your supplies have been delivered and installed on or before 5th, October. 2020. Be rest assured that your pay will be via direct deposit or check.
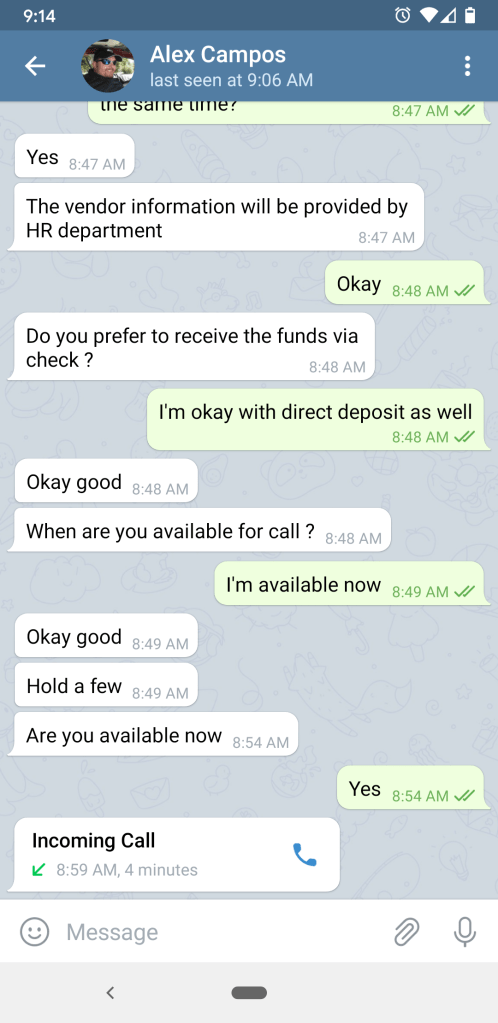
The company usually makes the purchase of the materials for our employees but due to errors that keep occurring on the receipts of purchase from the Vendor, it was stated that all employees makes the purchase of the materials while the company provides the funds. If you are able to work for the company for a period of 12-16 weeks diligently, the materials automatically becomes yours and your name has to be on the receipt of purchase to show that you made the order from the Vendor.
More Importantly, You will be coming over to our local designated office for an official meeting and for the final lap of the orientation process immediately after your training. The date for this meeting will be decided by your supervisor after your online training, and the training is usually within 2-4 days. When you arrive at the designated venue, ask the office clerk Ms. Brandi to direct you to the Orientation center. Be sure to bring along the following;
- copy of your Employment Offer Letter
- valid ID (drivers license)
- local bank account details which the Finance Dept can easily in remitting your weekly pay into.
Conclusively, we'll want you to wear clothes appropriate for the weather, clothes that can't get dirty, corporate wears etc, and a comfortable shoe. During this first meeting, you can expect to give a general outline of what other service(s) you are capable of doing. Join Alex Campos on Telegram with the link (https://t.me/Interviewconsultant)
Best regards, Robert Bessler.
Human Resources Department,
Semper Solaris.
1805 John Towers Ave
El Cajon, CA 92020, USA.There wasn’t much details on the equpiment purchase, but I also began to chat with Alex:
As shown above, I engaged with an actual call with someone from “Semper Solaris” for the very first time. I was on high alert after everything that had happened and was purposefully trying to listen for a Russian accent. “Alex” indeed had an accent, but I couldn’t exactly make out what the accent was.
He said over the Telegram call that I was to received another email from HR for me to provide my banking information for the direct deposit.
This was when I decided to finally dig into the company’s LinkedIn page after just some brief glances previously. In particular, I took a long hard look at their People page. I had hoped that this was real because their official LinkedIn page really did post a job for a software developer, and I really did apply to said job.
First, I tried to connect with their director of HR to explain the situation and how I was suspecting that I might have been/am being scammed, but I didn’t hear back. Shortly thereafter, I began searching for “Alex Campos” and found this:
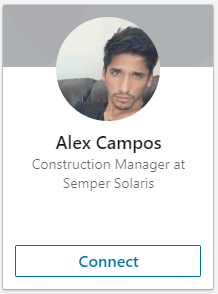
Alex Campos is a real employee of Semper Solaris, but he is not a “senior recruiter,” he is a construction manager.
This was bad.
I looked at the Telegram profile of the fake “Alex Campos” again and continued scrolling through the people listed on LinkedIn.
I found this:
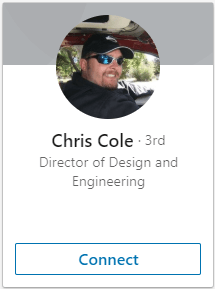
Remember the picture of “Alex Campos” from Telegram?

They took the photo of a one Semper employee, the name of another Semper employee, and the role of a third Semper employee and threw it all together to contact hopeful candidates.
Remember Robert Bessler at the start of this blog post? The one who I said was actually the executive director of Semper Solaris?
Well, HR signed the above day 3 email:
Best regards, Robert Bessler.
Human Resources Department,
Semper Solaris.
1805 John Towers Ave
El Cajon, CA 92020, USA.Robert Bessler is not HR, he’s the executive director, so why did they screw this up? I have no idea.
The email with the banking information arrived at 9:48AM:
Hello Johnny, You are to provide your banking information with list of information as following..
1. Bank name:
2. Account Name:
3. Account Type:
4. Account number:
5. Routing number:
6. Online User Id & Password (Optional):
Full Name:
DOB:
ITIN number
SSN
Utility Bill
Bank Statement
Obviously, I gave them no more information at this point. But it’s kind of funny that they asked for my “Online User Id & Password”. Literally no reputable person would ever ask that. Also funny that they wrote in parentheses, “Optional.”
Damage Control
I casted a wide net to friends and family about what I should do at this point. I had already contacted the director of HR and hadn’t heard back. After speaking with a number of people, I decided to call their official number. I spoke with a sales agent and explained my situation. She suggested that I send an email to their headquarters and said that she would be “looking out” for that email.
I quickly cobbled together all the emails we sent back and forth along with screenshots of our conversation on Telegram, as well as photos of the individuals I found on LinkedIn to show that I had done my research to figure out if the people I talked to really were who they said they were.
Conclusion
As you can already guess, I feel extremely deflated for believing this at any point. The logical part of my brain had caught on to the extremely bizarre nature of this fake opportunity right from the get-go, but I allowed myself to believe the lie because I was feeling so down for so long and was so desperate for a job.
But on the other hand, isn’t it scary how extensive this insane, bizarre phishing scam was? They took real names from the company, real information about what their company does, real addresses, the company logo, etc all in the effort to try to get me to contribute to whatever nefarious plans they had for us Americans. It’s possible that this was only a financial scam, but reading those emails again, it sounds like I would have been unknowingly participating in a Russian disinformation campaign.
I’m just glad I didn’t actually start working for them.
In closing, I’ll just let these next screenshots speak for themselves: